I heard two criticisms of my previous blog on the Raspberry Pi with Astro Pi hat project:
The cost was very high, considering all it did was display the time and temperature.
It’s not a real IoT application because the data is only displayed, and not stored or accessible outside my home network.
These are valid criticisms - so let’s build it again.
What will we try to accomplish in today’s build?
- It will use the least-expensive Raspberry Pi - the Pi Zero W – a $12 platform.
- We will explore a new way to provide IoT connectivity to the cloud.
- We will learn the Google Spreadsheets API available on the Raspberry Pi.
Comparison to other projects
We’ve done a lot of Time/Temperature projects, so what’s new about this one?
Project 1 - BME, ESP 01 and Cayenne
Project 2 - DS18B20, ESP 01, Google Sheets - Temperature only.
Project 3 - BME280, ESP 01, Google Sheets - Temp, Pressure and Humidity.
Project 4 - Raspberry Pi, Astro Pi HAT, Temp, Pressure and Humidity on Neopixel screen.
Hardware
| item | cost | notes |
|---|---|---|
| Raspberry Pi Zero W | $12 | $10.00 at seeedstudio.com
$10.00 at pishop.us $14.00 at adafruit.com £9.30 at Pimoroni.com £9.10 at ModMyPi.com |
| 8GB micro SD card | $4 | Estimate |
| Power adapter | $4 | Estimate |
| BME280 module | $2 | Estimate - eBay or AliExpress |
Design
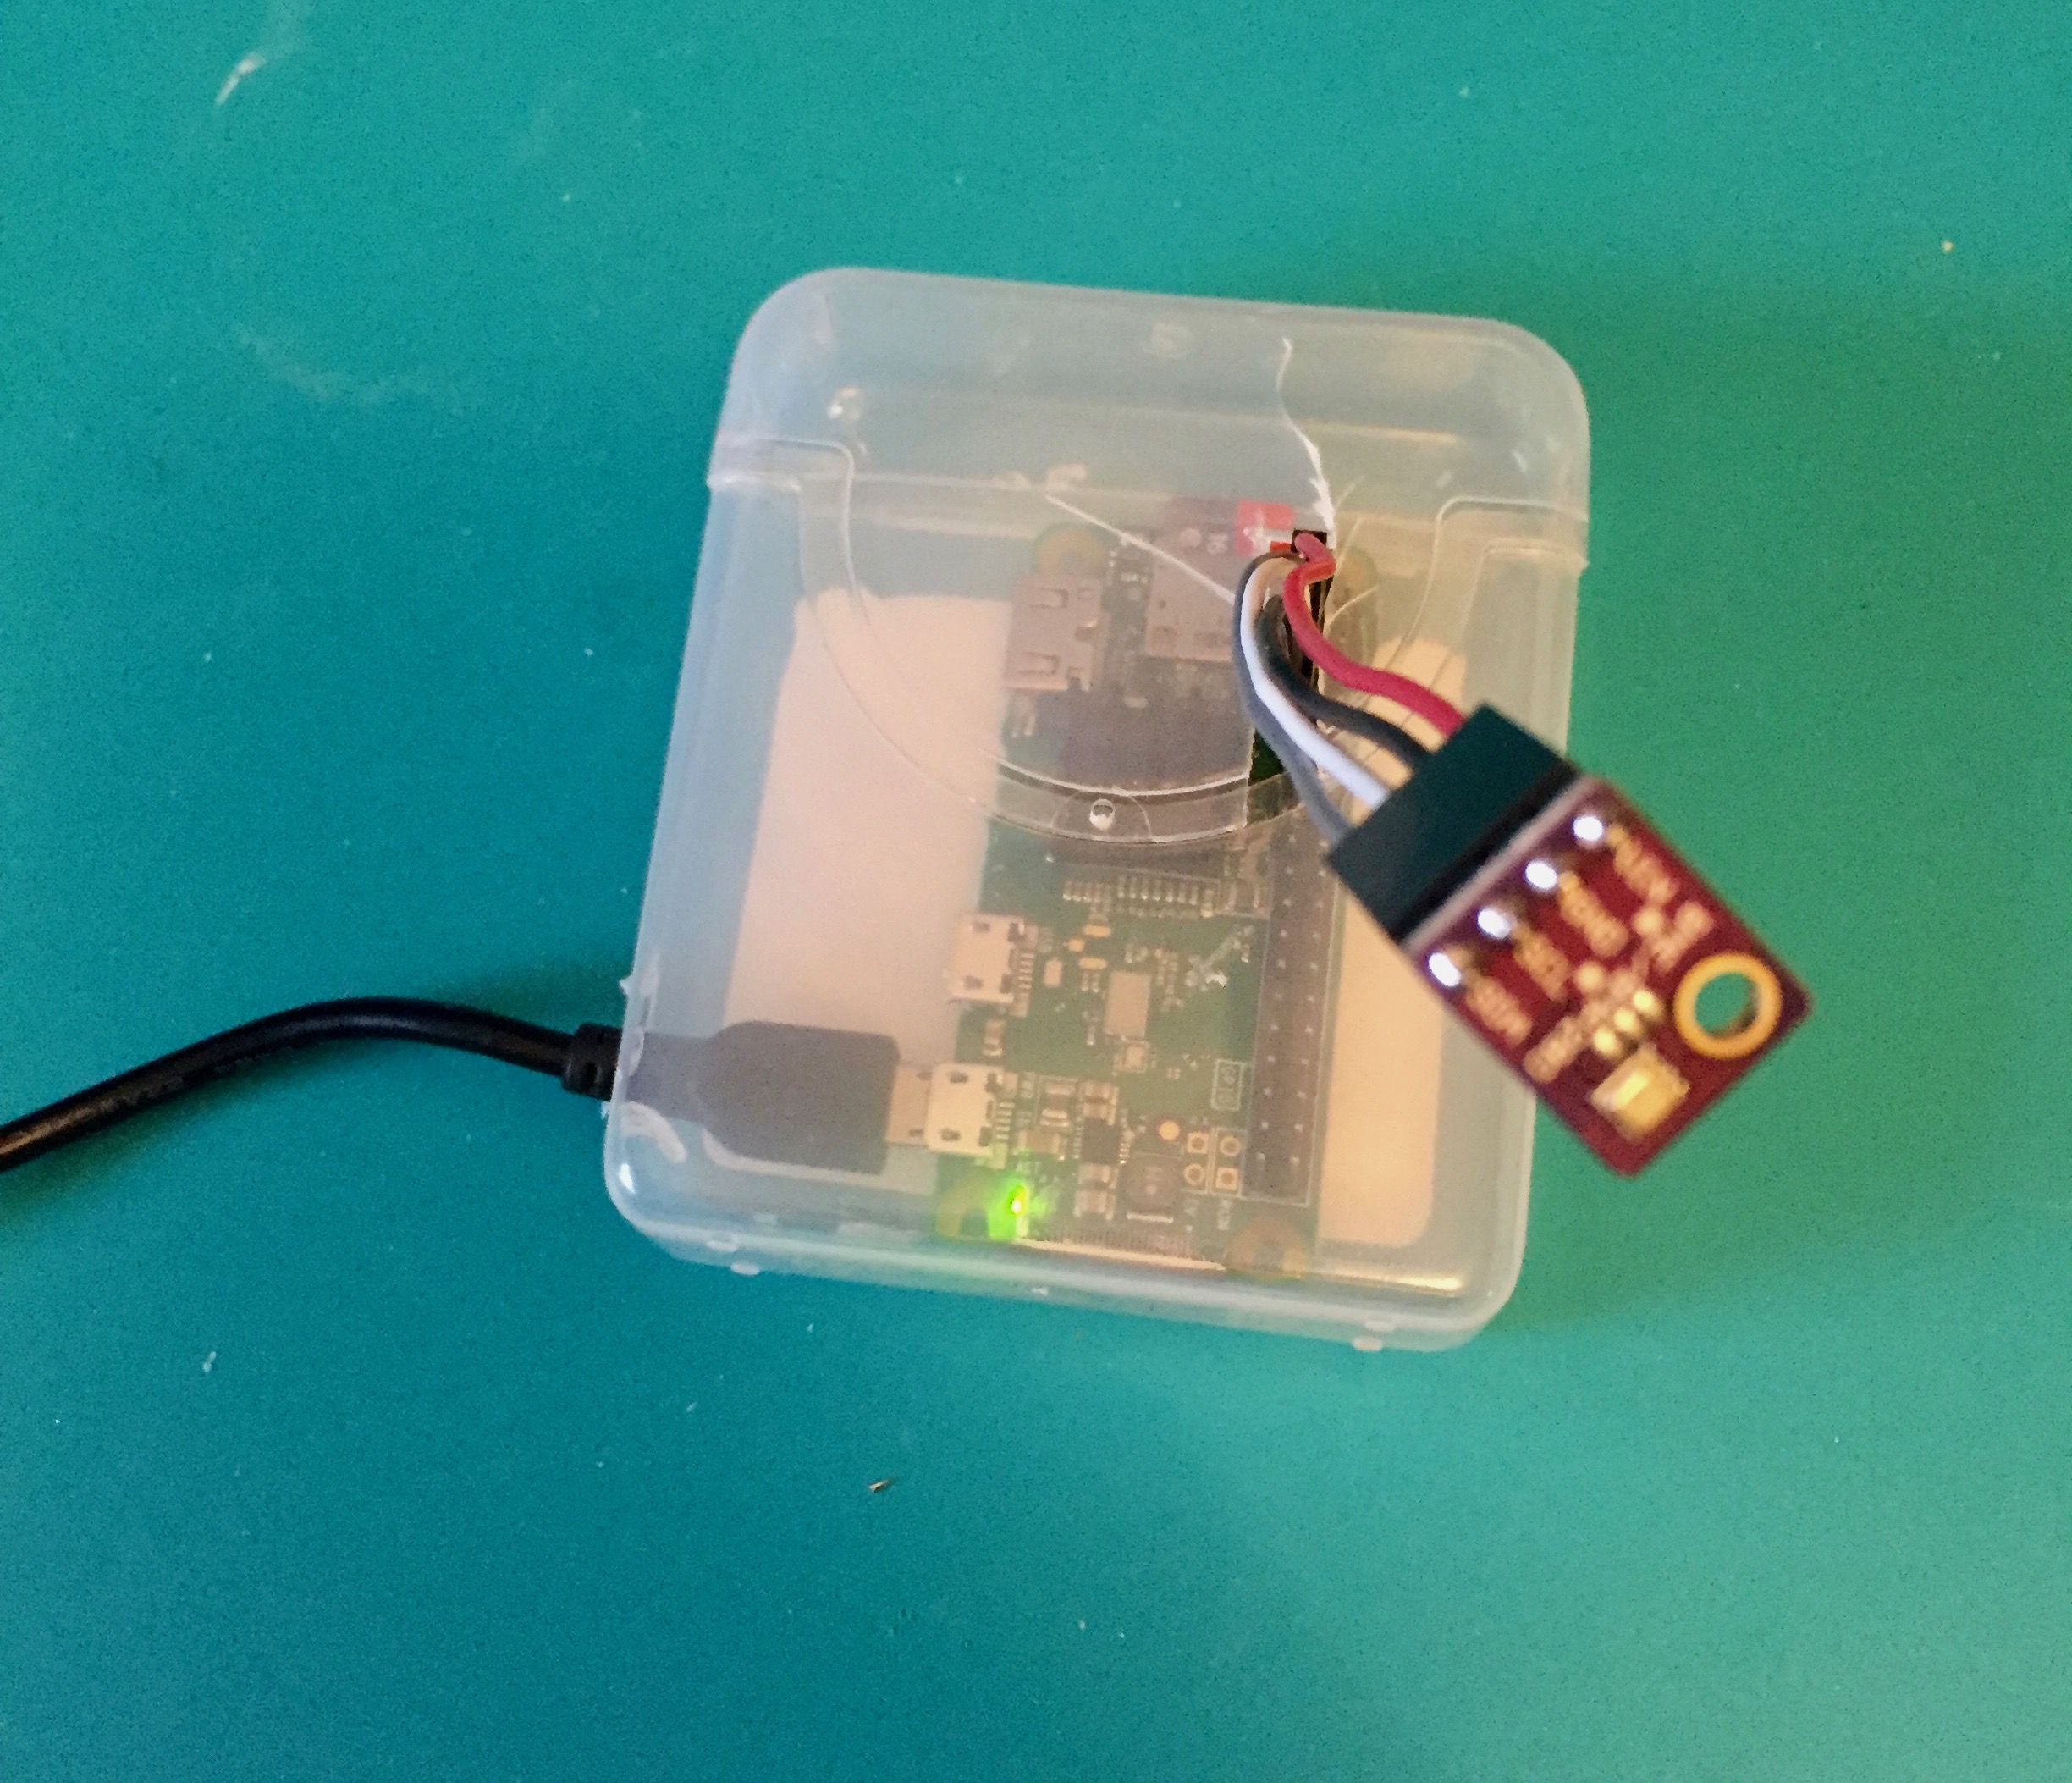
We’ll connect the BME280 using I2C to the Pi Zero’s I2C bus.
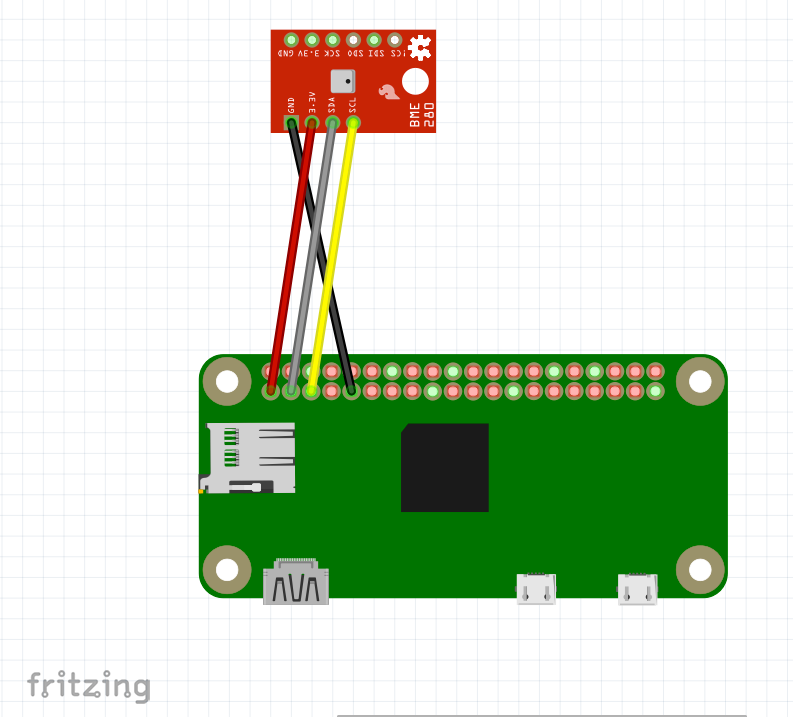
Cable or Wiring Spec:
| Pi Zero side | BME280 Module side † | ||
|---|---|---|---|
| Pin | Signal Name | Wire Color | 1x4 Female Header |
| Pin 1 (Pi pin 1) | 3.3v | red | Pin 1 3.3v |
| Pin 2 (Pi pin 3) | GPIO02/SDA | grey | Pin 4 SDA |
| Pin 3 (Pi pin 5) | GPIO03/SCL | white | Pin 3 SCL |
| Pin 4 (Pi pin 7) | unpopulated | -- | -- |
| Pin 5 (Pi pin 9) | GND | black | Pin 2 GND |
† Note: these pin numbers may vary on different BME280 modules.
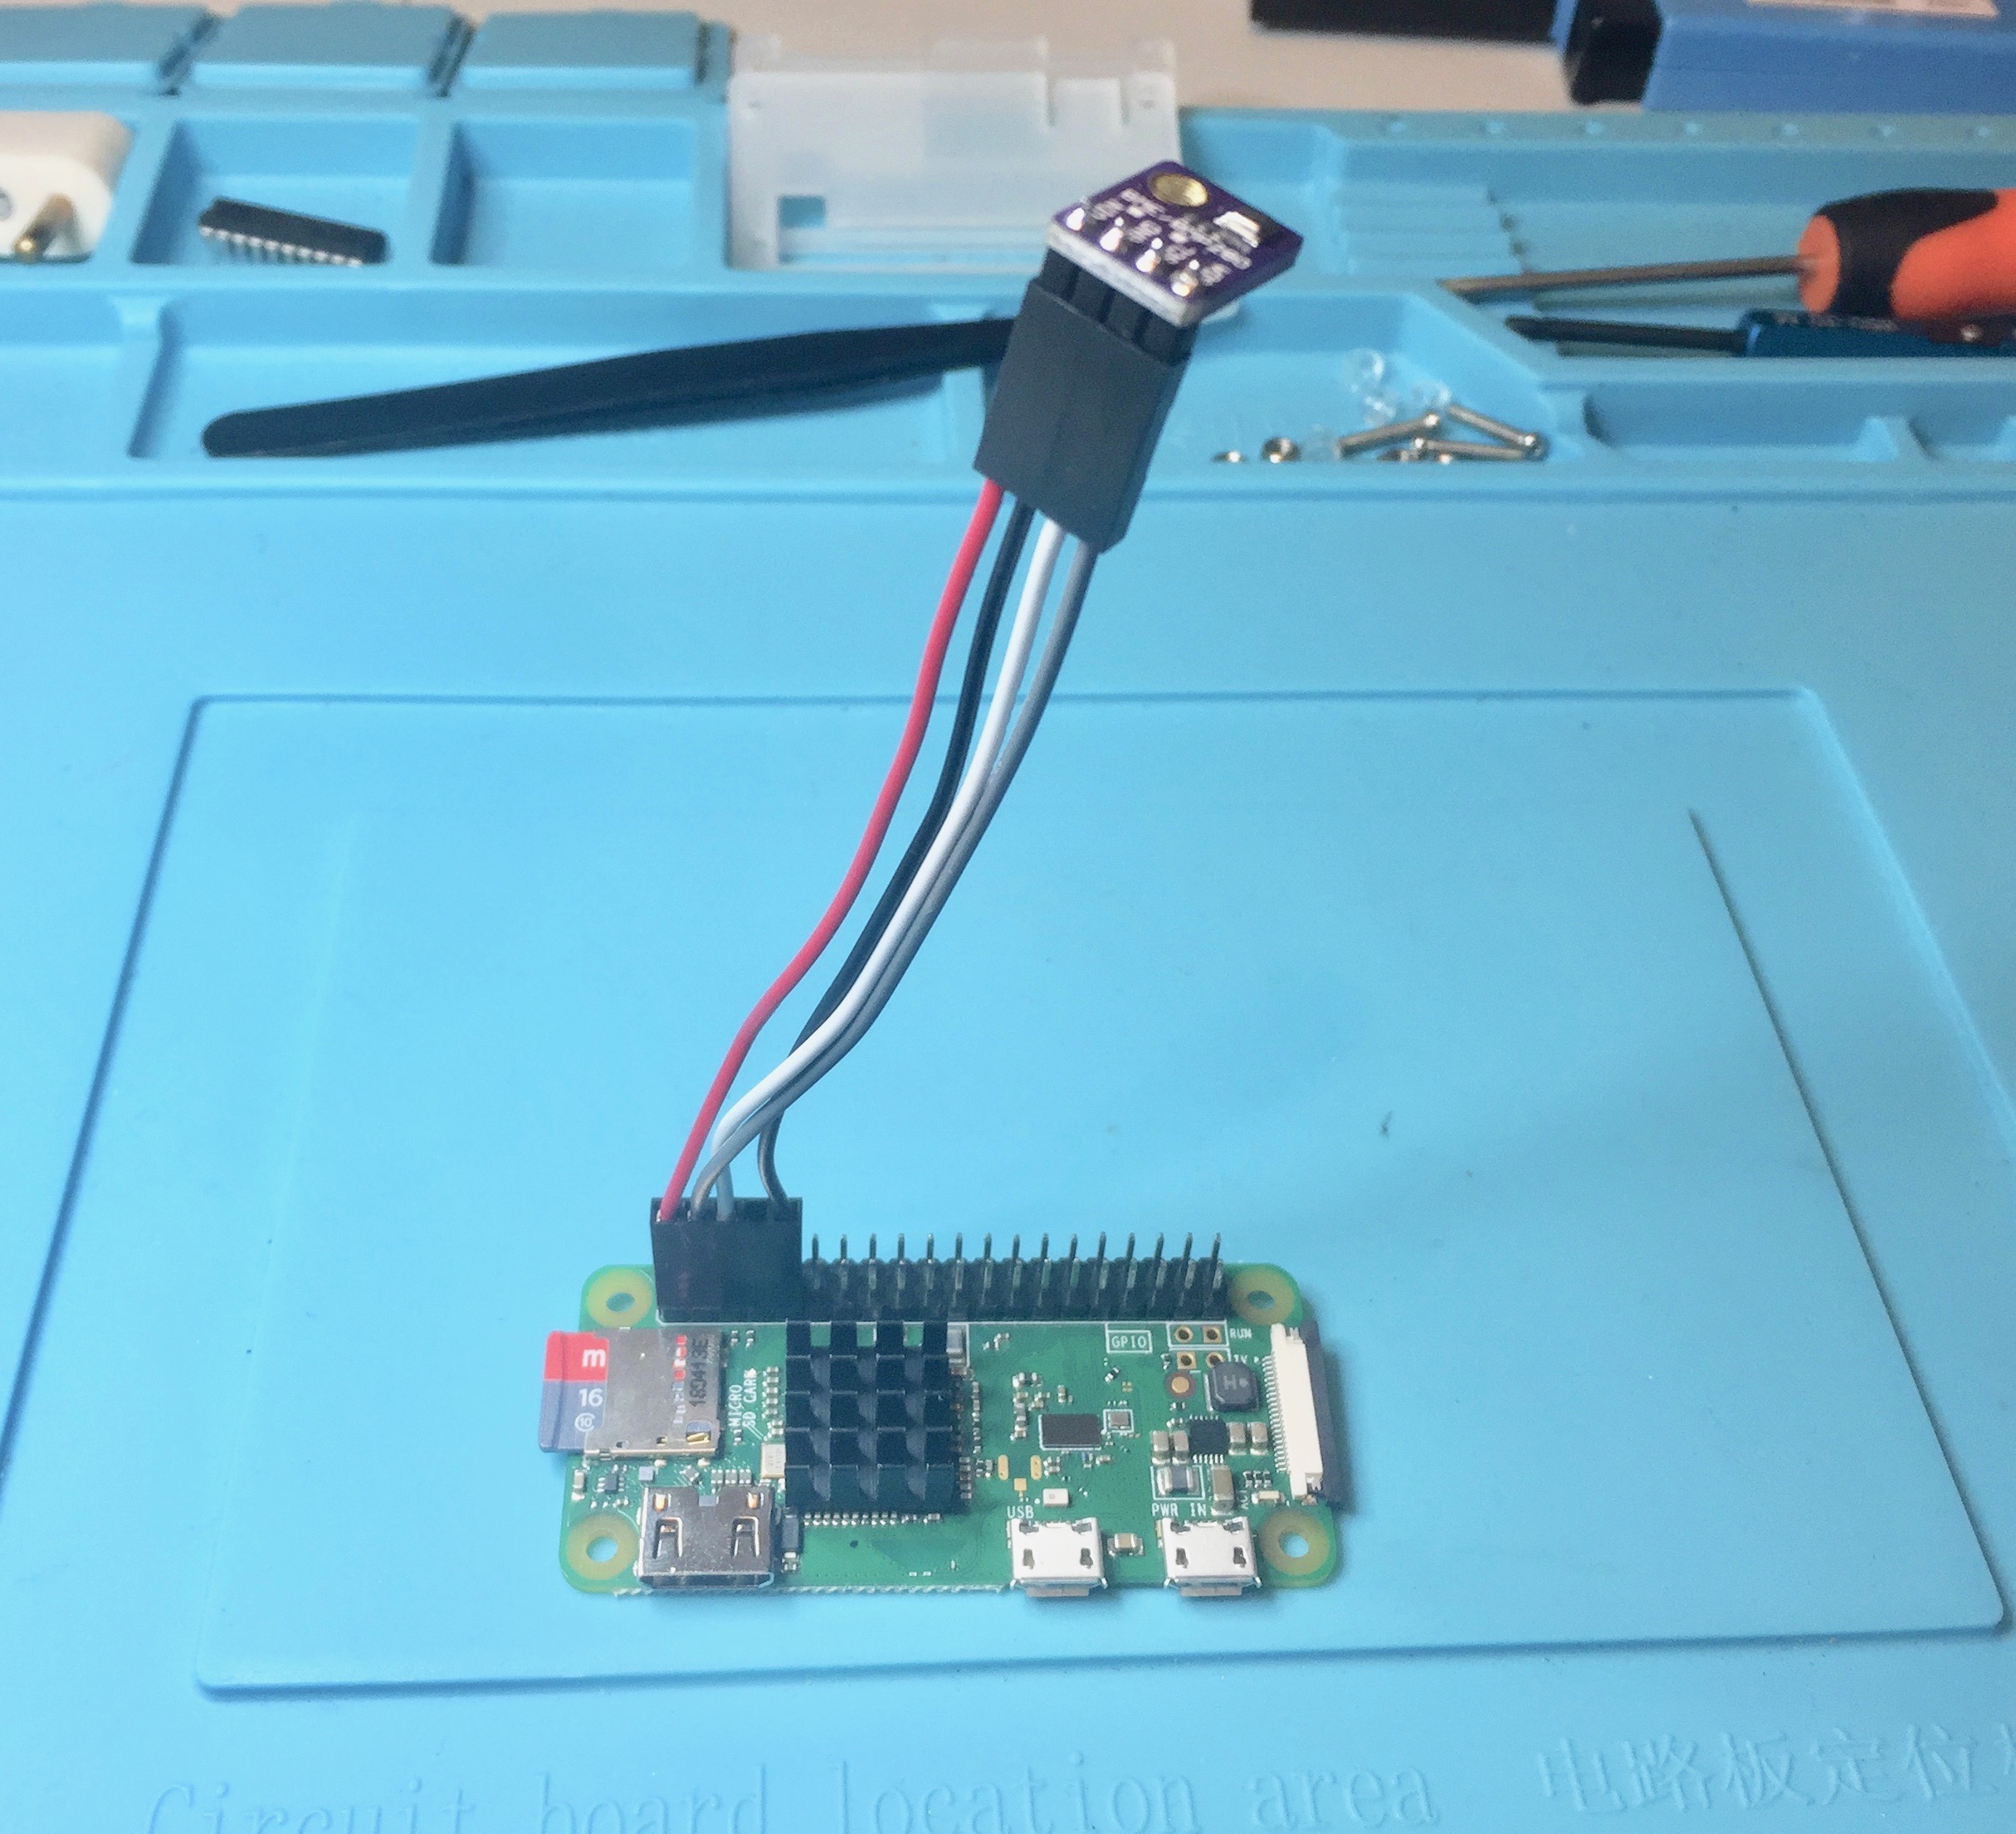
Pictured above, I’ve built a short custom cable, using 10cm Dupont cables. If you have never made custom Dupont Cables, see this video by Andreas Spiess.
IoT
There are many ways to build an IoT device and server. On the server side, you can use: Google Cloud, Amazon S3 Cloud, Apple iCloud, DropBox, pCloud, … the list goes on.
Alternatively there are the computing platforms: Amazon Web Services, IBM cloud services, Microsoft cloud service, Oracle Cloud, Google Cloud Platform, HP CloudSystem, Azure Cloud, AllCloud, Cloudian Hyperstore, … and many more.
Also to decide, is which protocol family to base the client/server interaction: MQTT on HTTP, or REST on HTTP, or pure GET or POST on HTTPS, or a custom sockets-based TCP/IP.
OK Stop.
To keep things simple, we’ll use an existing IoT framework — the Google’s client-side API that updates Google Sheets. Once in a Sheet, there’s a familiar and infinite way to summarize, plot, and present the data.
Rather than walking you through my development and learning process, let me point you to the following pages:
Introduction to Google Sheets API:
I recommend you try the Python Quickstart tutorial:
Authentication and Authorization are a little tricky:
The Google Sheet append API we use is documented here:
https://developers.google.com/sheets/api/reference/rest/v4/spreadsheets.values/append
Software Installation
There are several pieces of software to install – support of I2C and the BME280, the Google Sheets API, a Python script, and a crontab entry.
I2C support
After enabling I2C in raspi-config, execute these shell commands to install the i2c-tools.
sudo apt-get update
sudo apt-get install -y python-smbus i2c-tools
After a reboot, the I2C interface should be up. This can be tested with the i2cdetect command.
With only the BME280 on the bus, run i2cdetect -y 1 and you should see this:
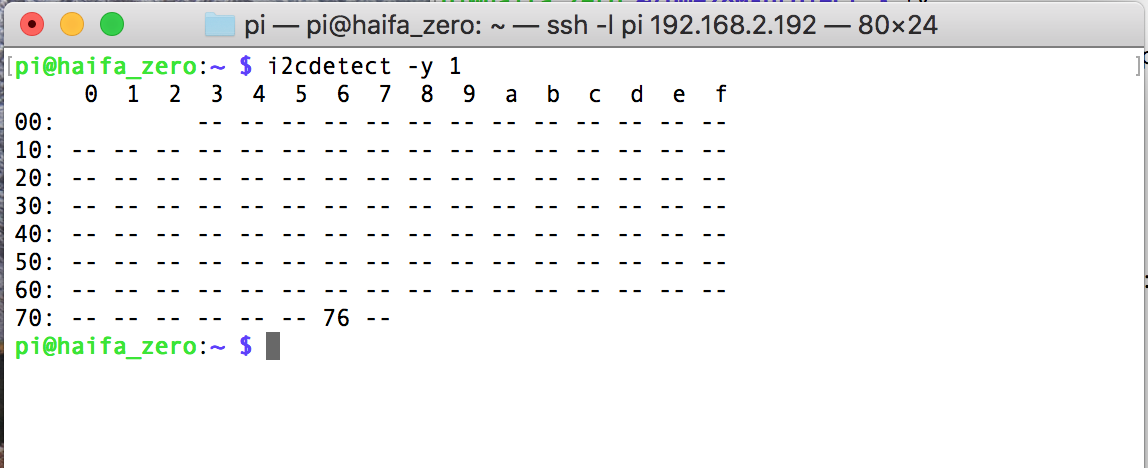
BME280
Next, install support for the BME280 chip. The best package I found was at
https://github.com/cmur2/python-bme280
Install with these commands
mkdir bme280-project
cd bme280-project
git clone https://github.com/cmur2/python-bme280.git
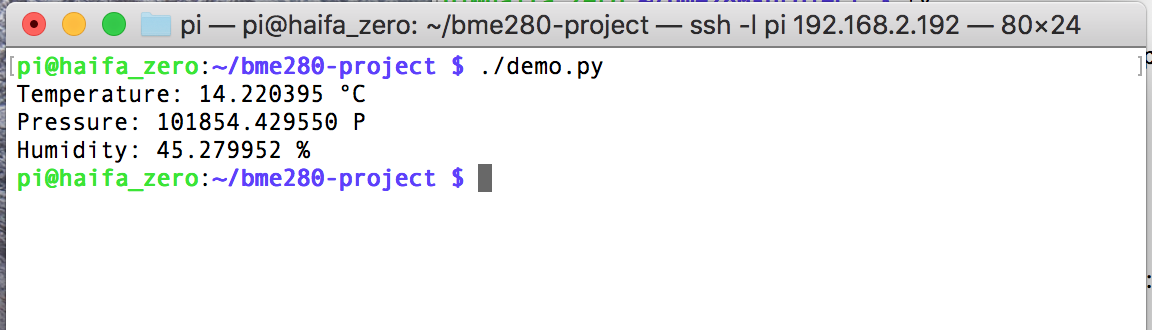
Now we are ready to test the BME280.
python demo.py
Google Sheets Interface
Before we can use Google Sheets, do the following command.
pip install --upgrade google-api-python-client oauth2client
Next, you obtain the Spreadsheet ID and credentials for the Spreadsheet you wish to insert data into. Follow the instructions in the Google Sheets API sites linked above.
Below is the Python code I wrote for this application:
# import many libraries
from __future__ import print_function
from googleapiclient.discovery import build
from httplib2 import Http
from oauth2client import file, client, tools
from oauth2client.service_account import ServiceAccountCredentials
import bme280
import datetime

# My Spreadsheet ID ... See google documentation on how to derive this
MY_SPREADSHEET_ID = '1tIpNwBEdbLACms2RFY-pO0...'


def update_sheet(sheetname, temperature, pressure, humidity):
    """update_sheet method:
       appends a row of a sheet in the spreadsheet with the
       the latest temperature, pressure and humidity sensor data
    """
    # authentication, authorization step
    SCOPES = 'https://www.googleapis.com/auth/spreadsheets'
    creds = ServiceAccountCredentials.from_json_keyfile_name(
            'bme280-project.json', SCOPES)
    service = build('sheets', 'v4', http=creds.authorize(Http()))

    # Call the Sheets API, append the next row of sensor data
    # values is the array of rows we are updating, its a single row
    values = [ [ str(datetime.datetime.now()),
        'Temperature', temperature, 'Pressure', pressure, 'Humidity', humidity ] ]
    body = { 'values': values }
    # call the append API to perform the operation
    result = service.spreadsheets().values().append(
                spreadsheetId=MY_SPREADSHEET_ID,
                range=sheetname + '!A1:G1',
                valueInputOption='USER_ENTERED',
                insertDataOption='INSERT_ROWS',
                body=body).execute()


def main():
    """main method:
       reads the BME280 chip to read the three sensors, then
       call update_sheets method to add that sensor data to the spreadsheet
    """
    bme = bme280.Bme280()
    bme.set_mode(bme280.MODE_FORCED)
    tempC, pressure, humidity = bme.get_data()
    pressure = pressure/100.
    print ('Temperature: %f °C' % tempC)
    print ('Pressure: %f hPa' % pressure)
    print ('Humidity: %f %%rH' % humidity)
    update_sheet("Haifa_outside", tempC, pressure, humidity)


if __name__ == '__main__':
    main()
CRONTAB
Our Python script can be run by crontab, periodically.
To do so, add the following line in crontab: (using crontab -e)
*/30 * * * * (cd /home/pi/bme-project/; ./bme280-reading.py)
The token */30 means run the command portion every 30 minutes.
The command portion is: (cd /home/pi/bme-project/; ./bme280-reading.py) which means, fork a subshell, cd to the bme-project directory, and run the python code from that working directory.
Once set up, you should see data being added to the Sheet every 30 minutes.
Deployment & Result
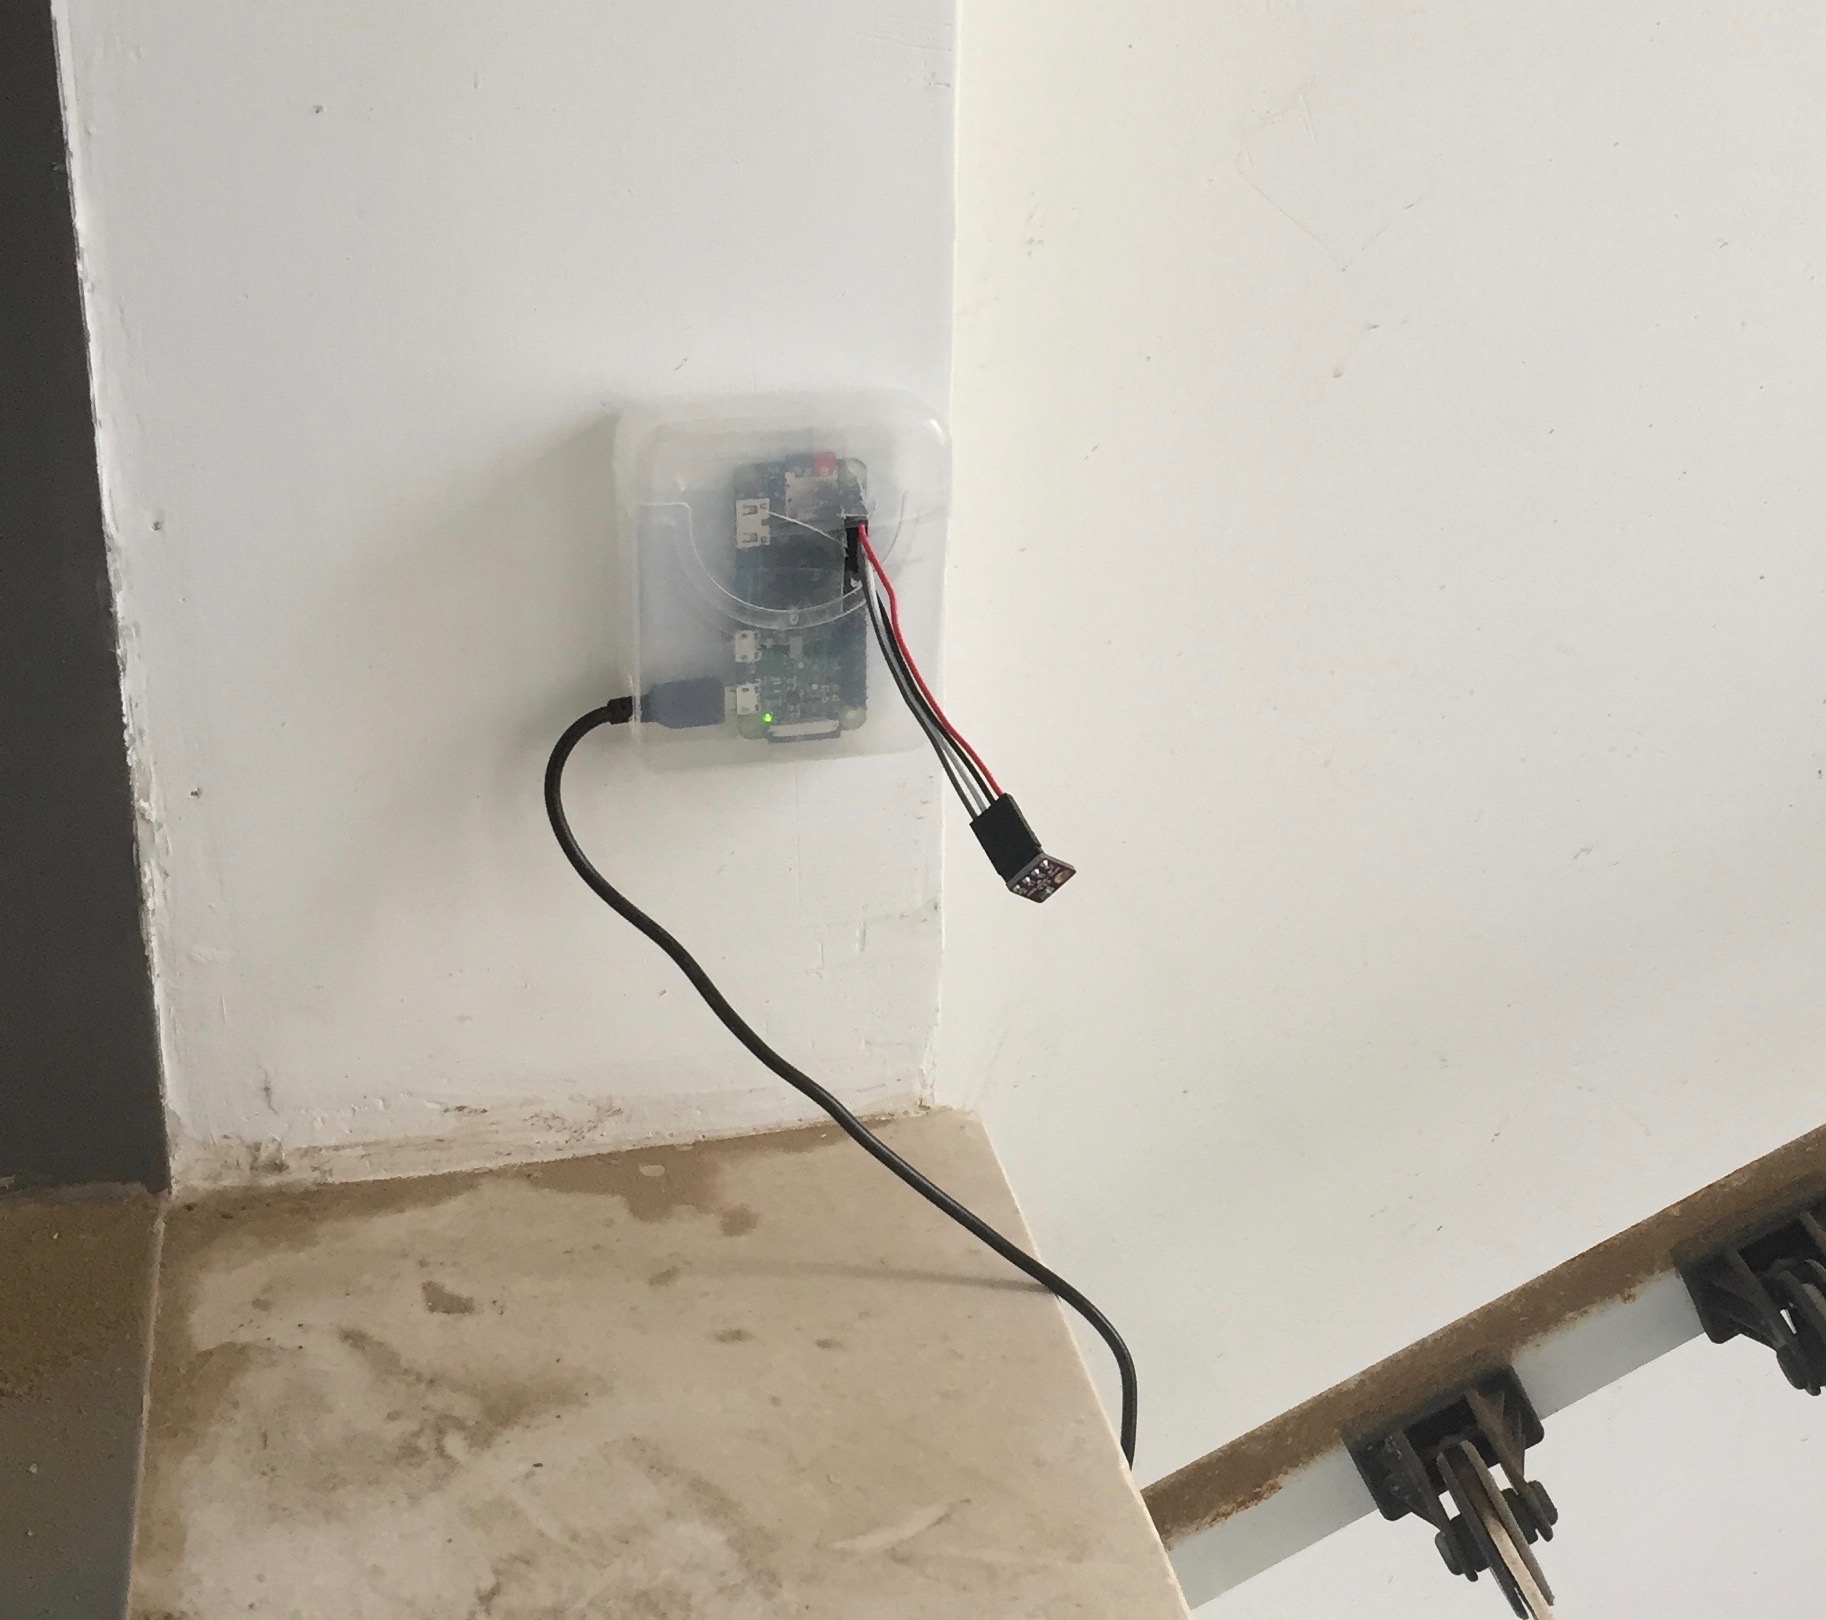
I fashioned a case from a Q-Tip travel box. It was $0.99 at CVS and even included 30 Q-Tips! I cut holes for cables and sealed them with hot-glue.
This is attached to my house outside with double sided tape, protected from direct rain and direct sunlight on my covered patio.
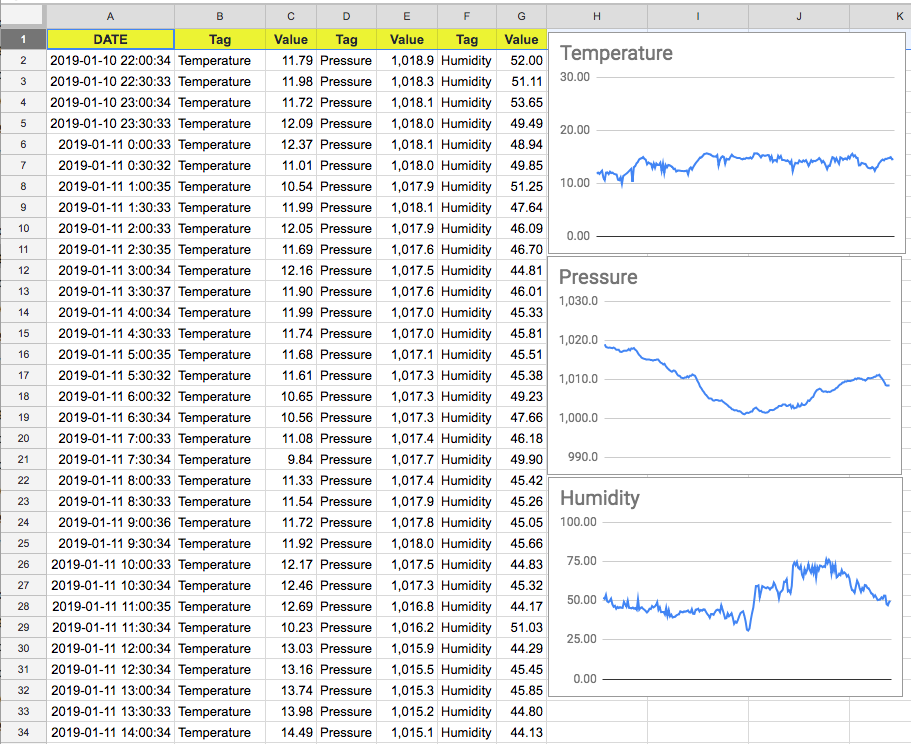
Below we see the result. The Pi has entered rows of sensor data, every 30 minutes.
It is now easy to draw charts using standard spreadsheet graphing functions.
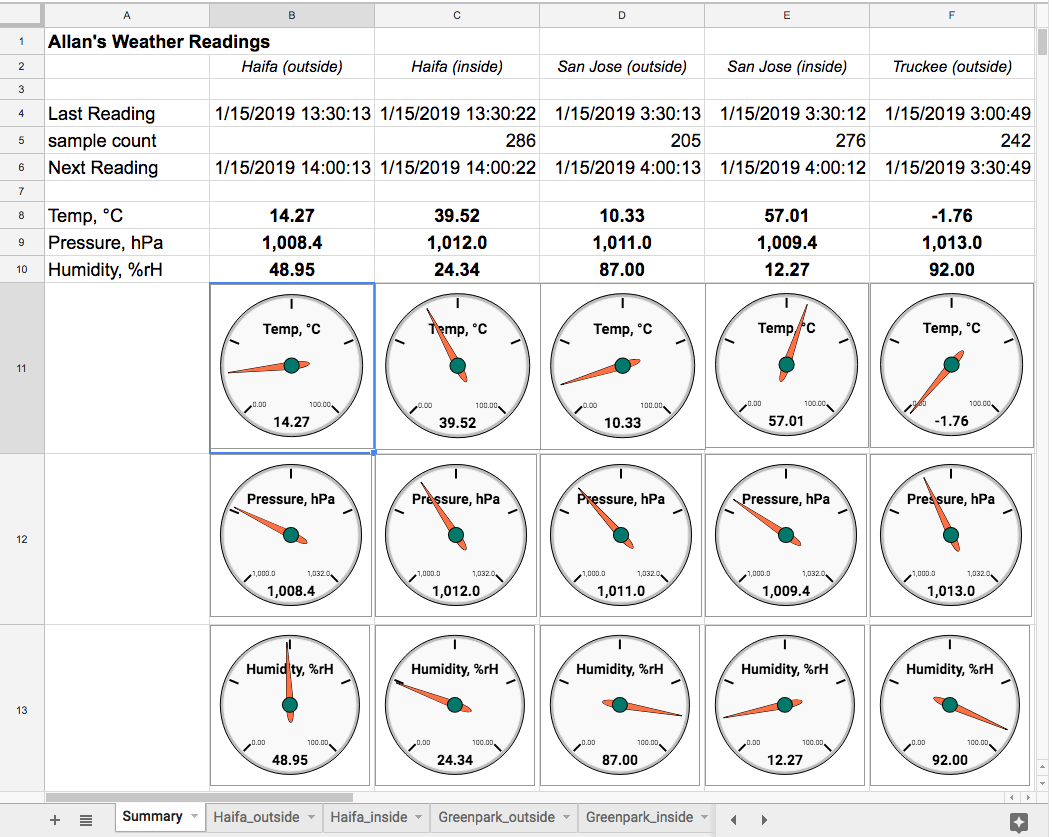
Extending to multiple Devices
The next step was to build a few more of these. It is simple enough to send the sensor samples to different sheets within the same spreadsheet. Then, the top sheet can summarize or present a dashboard.
Summary
Use the Google Sheets API to directly write to any Google Drive file. This is a powerful paradigm, especially for monitoring your personal IoT devices. It is a lot easier and more general that IoT device integrators, such as Blynk or Cayenne. One doesn’t need to understand the underlying protocols, because a well-defined Python API exists. It is completely customizable and under your control.