A chance encounter on a Facebook group brought me - literally - to the Edge. I read a post in which someone mentioned the ThingsonEdge "Cricket" board. A plethora of hostile comments followed. Everyone said it was too expensive, wasn't sufficiently capable, or superfluous in today's market.
I have a phobia about gratuitous on-line hostility, so to give the developers some encouragement, I wrote, "Good work. Well done."
That simple comment led to correspondence between me and the Cambridge, England-based developers of the Cricket. After a few exchanges I began to get an inkling of what they're trying to do.
They sent me to their Developers' Guide to read in more detail.
On the Board
The "Cricket" board incorporates three main components:
- An ESP8266
- A temperature sensor
- A Real Time Clock (RTC)
It's a fraction larger than an ESP8266 01 but the board is much, much, busier - and orders of magnitude more sophisticated.
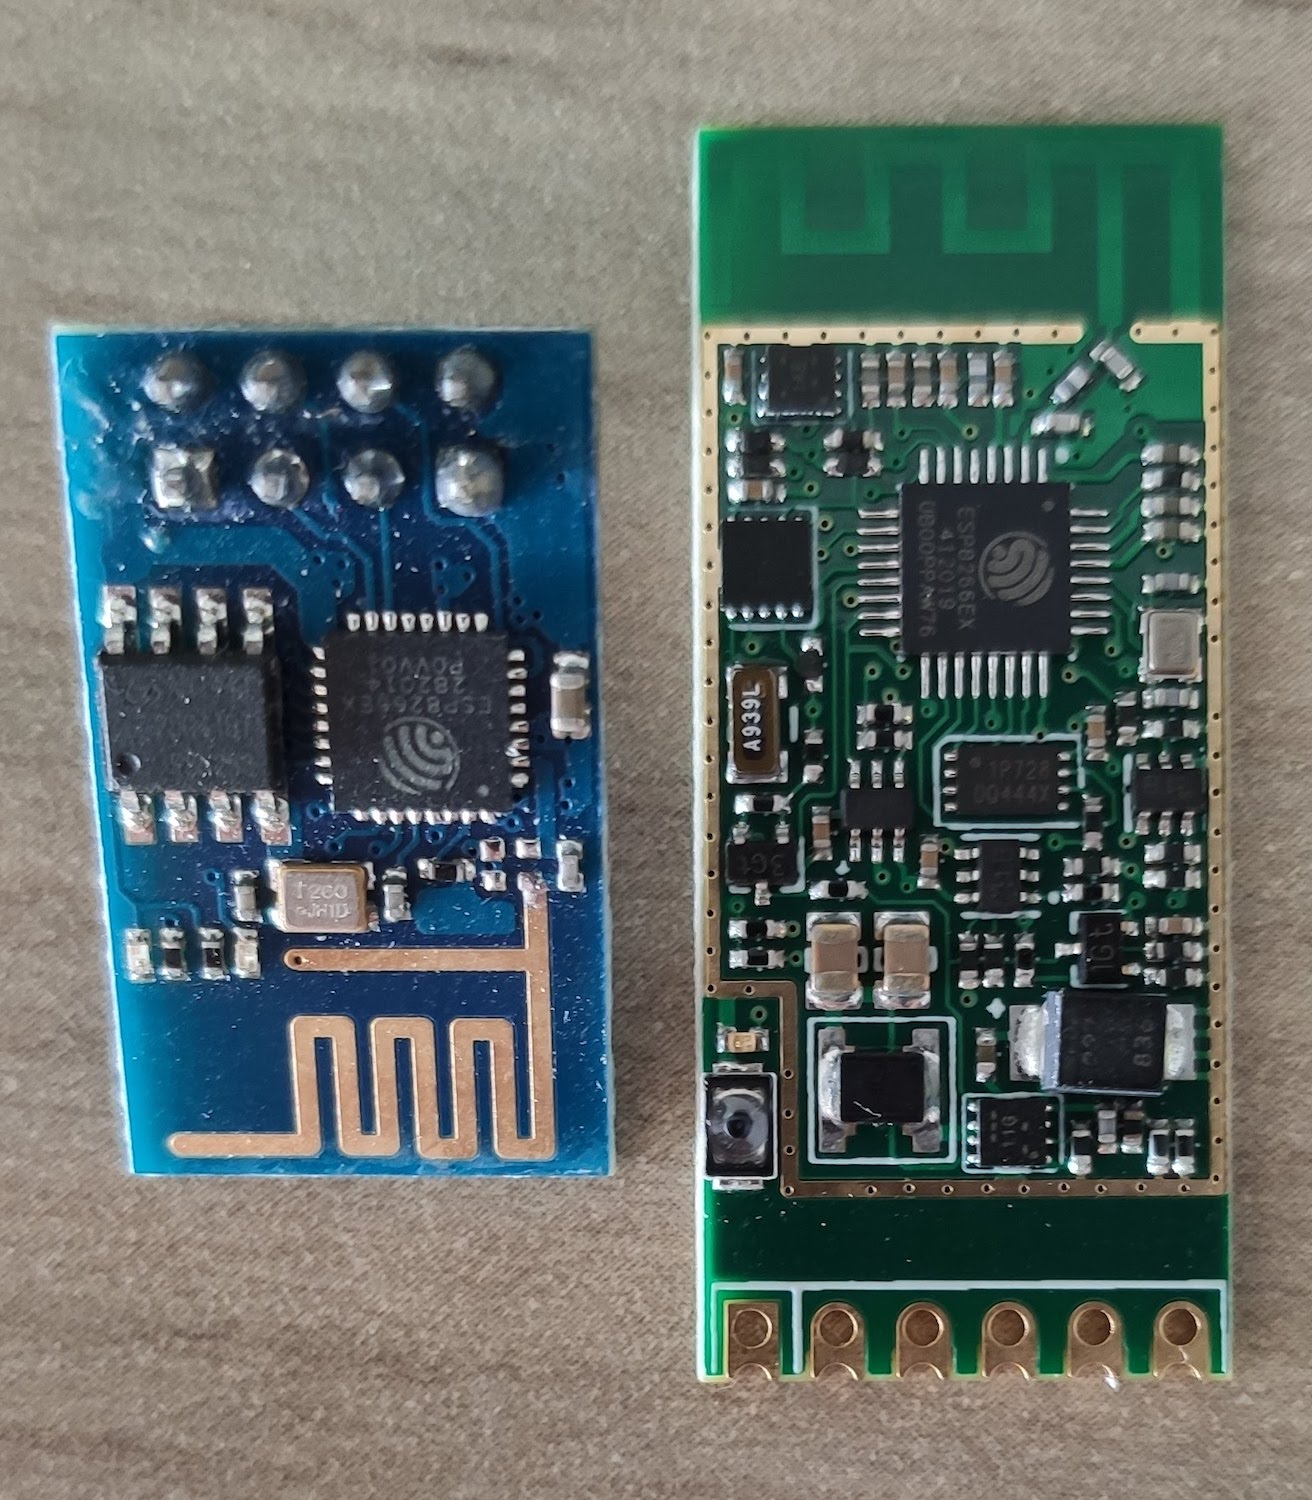
At first, I couldn't understand the developers' motive. Why produce a very complicated board at a premium price (20 dollars), to do much the same as a $2 ESP8266 01?
I chatted with them and through their explanations and a deeper reading of their guide, I began to grasp the rationale.
First, and above all, they have introduced very efficient power management. Their Guide says "Cricket’s operating voltage is 1V - 3.5V and can be powered by almost any battery."
1v - 3.5v on any battery?! You mean, we don't need an 18650? And it will run on 1 volt? How can that be?
They also claim that in some circumstances the board could run for years. "Cricket connects over standard Wi-Fi it can be directly powered from a battery (AAA, AA, …) - for years when utilising a true 0A feature."
This all seemed a little far-fetched, so I delved deeper. But let's understand the problem first.
Power Management and the ESP8266
Since I began tinkering with the ESP8266 more than four years ago, I've consistently met the same roadblock; the ESP family requires considerable current when connecting to WiFi. For this reason, small batteries usually have limited life - which makes it difficult to use the ESP in remote locations, especially if it needs to report home frequently.
There are all sorts of solutions for this. If there's a switch attached, the ESP can remain in the off state only to come on when triggered. If there's a sensor attached it usually goes into deepsleep, waking only to report its status. However, deepsleep still needs a trickle - which sucks power from small batteries. Another solution is to attach a rechargeable 18650 battery board that's topped by a solar panel. (I have this setup with a DS18B20 temperature sensor that has been reading my balcony temperature every half hour for more than two years. Other ESPs around the house are powered by old cell phone chargers.)
The bottom line is that powering the ESP has always been an issue.
How does the Cricket get around the problem?
Without being too technical, I'd summarize my findings like this:
The board's ESP is completely powered down by default - so it's consuming no current at all. The only thing that's receiving a trickle on the board is the RTC. (According to their Guide, it's about ~0.3nA - nano Amp, not milli or micro!) When triggered, the RTC wakes up the ESP, it does its thing, and powers back down.
The Cricket can be easily programmed so that it will only connect to WiFi if it registers user-defined differences from the last state. So, if there's no change in the temperature since the last reading, it won't bother to consume power by connecting to WiFi.
Can we send you one to get your feedback?
My intrigue led to enthusiasm. Could I really solve the power problem with a couple of AAs? I corresponded more with the developers and when they saw I write these blogs, they offered a test drive.
This was at the start of the pandemic when the world's airlines were grounded and I wondered how long it would take a board to reach me from England.
About two weeks later, a small envelope appeared in my mailbox bearing a stamp of Queen Elizabeth. (Did anyone notice she was riding a horse at the age of 94? If I can stand up at 94 I'll be happy!)
Getting Going
So there I was with a little six-pin board wondering what to do with it.
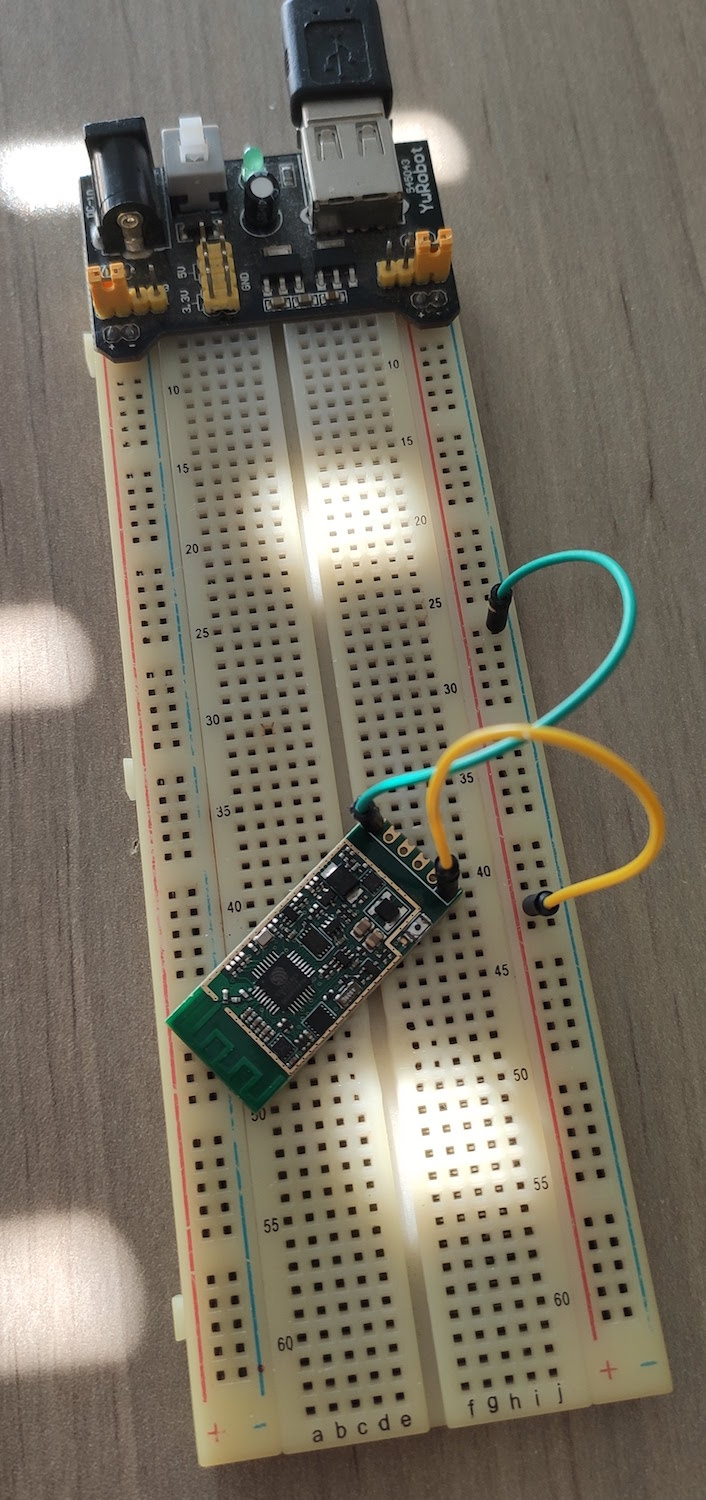
The first thing, of course, was to set it up. I took out a breadboard and impaled the Cricket on a 3.3v line with a couple of header pins. Then I surfed over to their Dev. Guide.
Anyone who has read my blogs knows I often have problems with developer guides. Mostly written by engineers, they're usually bristling with technical jargon that obfuscates their meaning for the untrained layman. There is a need for technical guides, but there's just as much a need for a simple user guide. For anyone completely new to the field, the ThingsonEdge Dev. Guide might be a bit intimidating, so here's my very simple setup:
- Apply a voltage (up to 3.5v) to the Batt and GND terminals
- Open an account at thingsonedge.com.
- Write down the serial number from the back of your Cricket because you'll need it to register.
- Press the little button on the Cricket for five seconds.
- The Cricket will go into AP mode (Access Point) and broadcast a web page on its own network.
- Join the network on your computer.
- Surf to http://192.168.4.1/index.html with your browser.
- Complete your home wifi credentials.
Your Cricket will now restart, log on to your home network, and register at ThingsonEdge.com.
Updating the Cricket Over the Air (OTA)
Once you've completed this process, you're taken to the ThingsonEdge Developer Portal where you can configure your Cricket.
Note: The developers have informed me that the imminent next iteration of Cricket will be "Cloud Agnostic" so that you're not dependent on their cloud service. Updating will be done locally, from your local network.
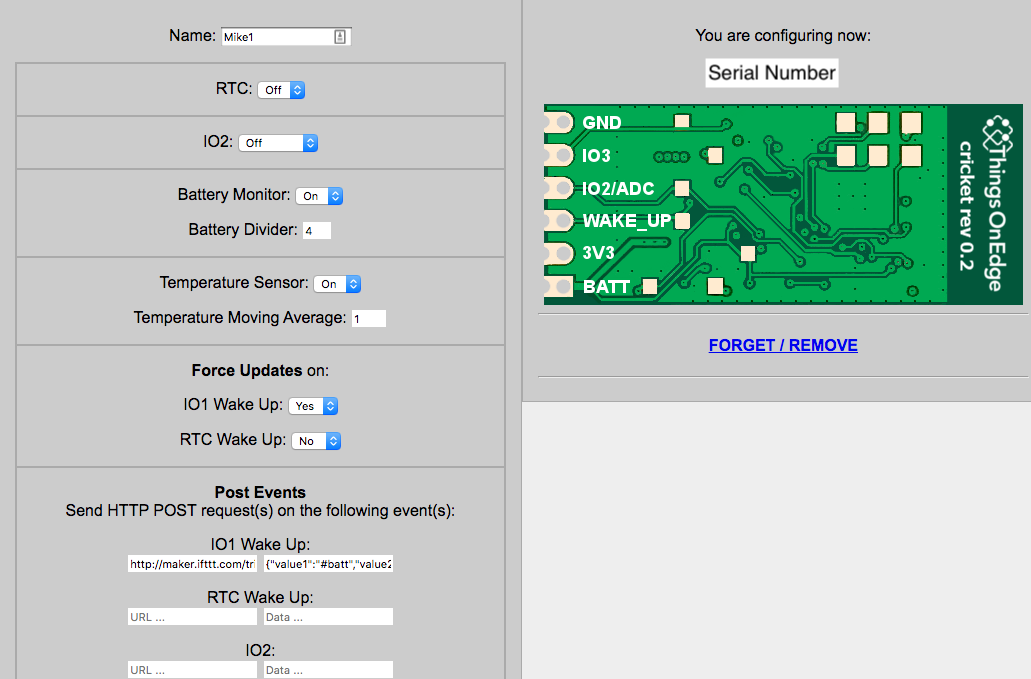
I'm not going to explain every permutation of the portal but I'll highlight the main features. You can:
- Turn the RTC on and off and set the interval. This means you can have the Cricket wake up and perform certain tasks at predefined intervals.
- Turn the temperature sensor on and off and set a trigger.
- Turn the battery level sensor on and off.
- Turn the input/output pins on and off.
- Set up MQTT or HTTP to communicate with the ThingsonEdge or 3rd party MQTT server. HTTP can be used with IFTTT.
I'm told that several more options are to be made available on the next version of the board due out shortly, including a second I/O pin.
To configure your Cricket, set what you want on the Portal, press the micro-button on the Cricket for one second, then wait for a few flashes of its on-board blue LED. Refreshing your browser should indicate that your Cricket is now reprogrammed with your new configuration.
Yes, it's really that simple. No struggling with code and flashing sketches into a temperamental ESP. Just press a button, wait five seconds, and you're ready to go.
Advantages and Disadvantages of OTA from the Developer Portal
There's no question that configuring the Cricket Over the Air from the portal makes for really simple configuration. Within seconds you can set it up to report the temperature to IFTTT, send a message through MQTT, or detect motion using a sensor. Absolutely no programming knowledge is needed.
The disadvantage is that you're limited to what the Development Portal allows you to do. You can't flash the ESP8266 with your own code and this may be restrictive for the more advanced user.
(The developers assure me their next iteration will have many more features.)
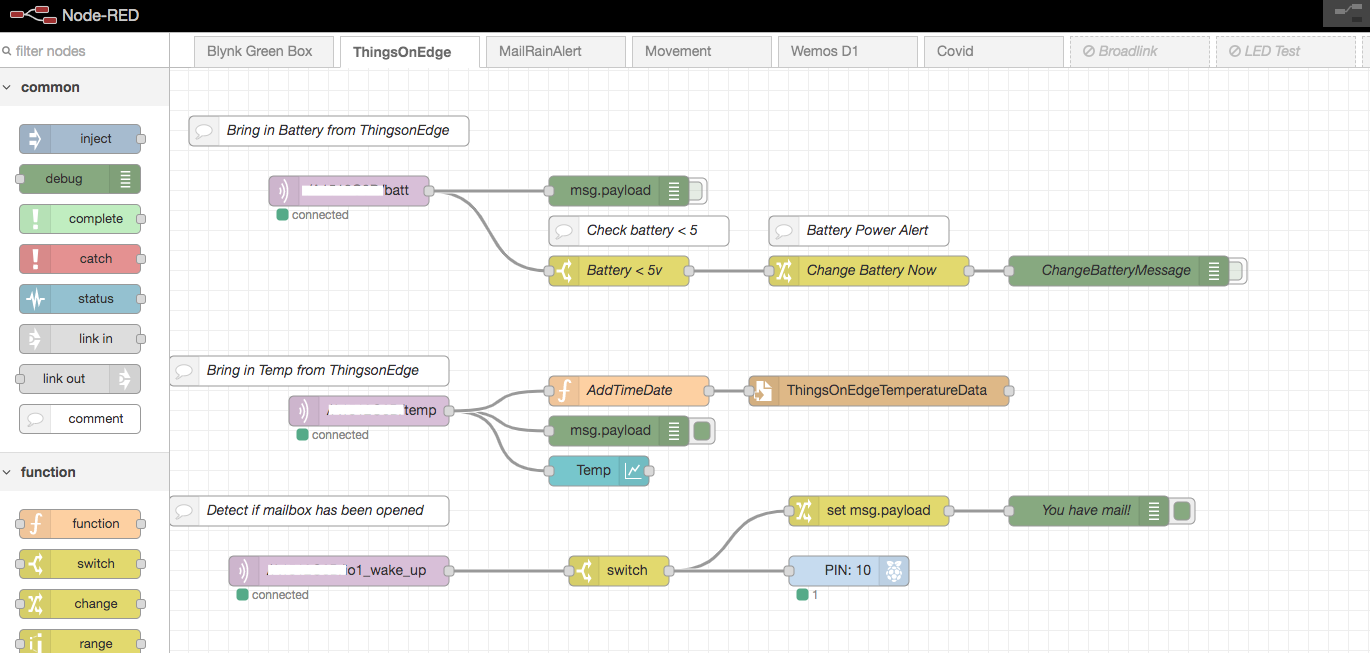
For me, there was a collateral advantage. For years I've known about MQTT but I've been too lazy to look at it. Realizing that the usefulness of the Cricket would be vastly improved - and a pandemic lock-down is the perfect time for learning, I decided to give myself a crash course. As my local MQTT server would run on a Raspberry Pi, I threw in Node Red at the same time.
So, the very restrictions of the Cricket board ultimately led me to study the incredible power of MQTT and Node Red. Indeed my next blog post may well be the little ESP8266 01 alert board I created while learning.
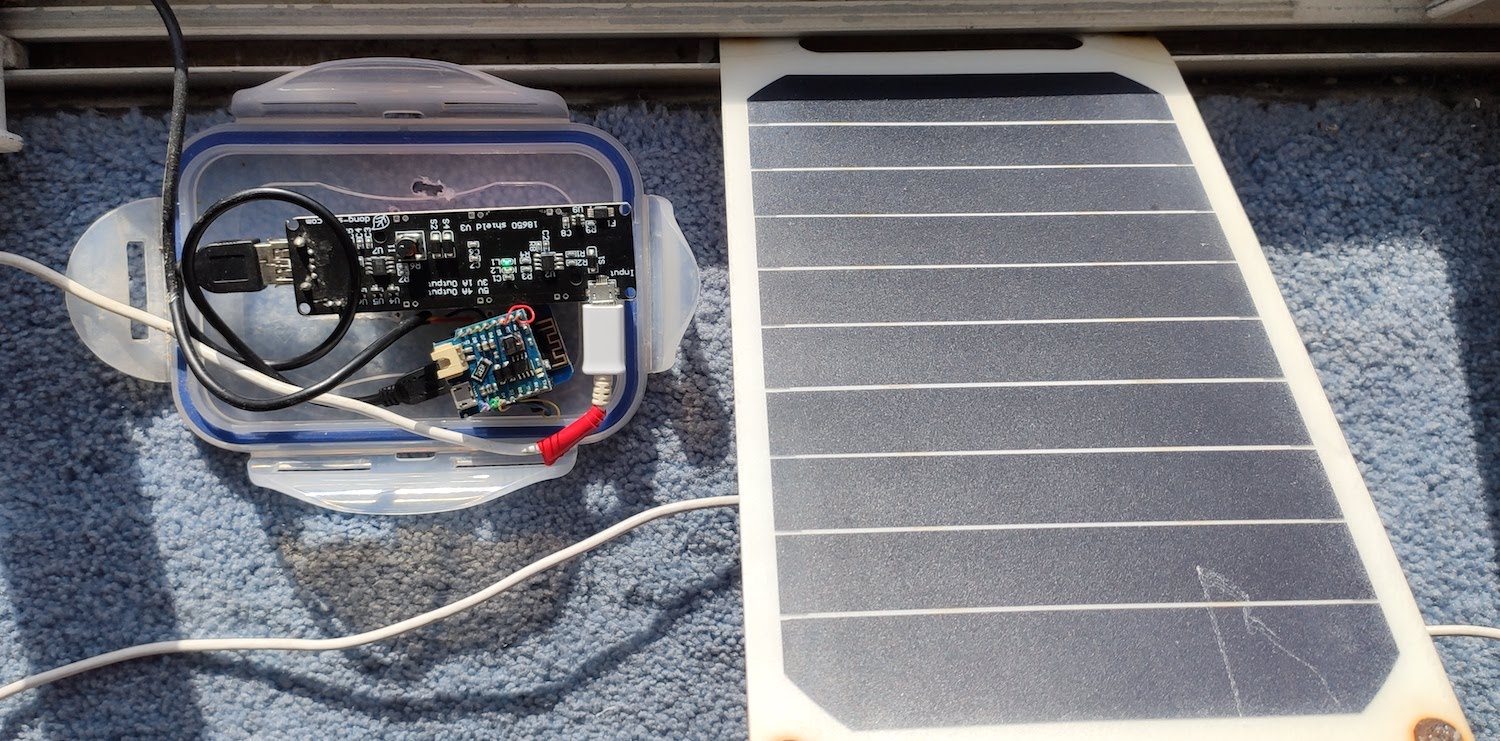
In the Field - Deployment in Mailbox Notifier
The first blog I ever wrote for this site was my Mailbox Notifier.
A quick reminder - the mailbox is about 40 steps below my house and surrounded on all sides by a 60cm reinforced concrete wall. There is no light for a solar panel, and there is no chance of a puny WiFi signal penetrating through the surrounding wall, then a distance of 30 meters - then through another concrete wall to my router.
I solved the distance and obstruction problem by running a long wire from the mailbox to an ESP mounted half way up the steps to my house. The wire attaches to the reed switch in the mailbox. With the ESP now unobstructed, it's within WiFi range of my router.
The Mailbox notifier would be a great trial for the Cricket. If I could power it with just two AA batteries it would be a huge relief after years of fiddling with 18650s.
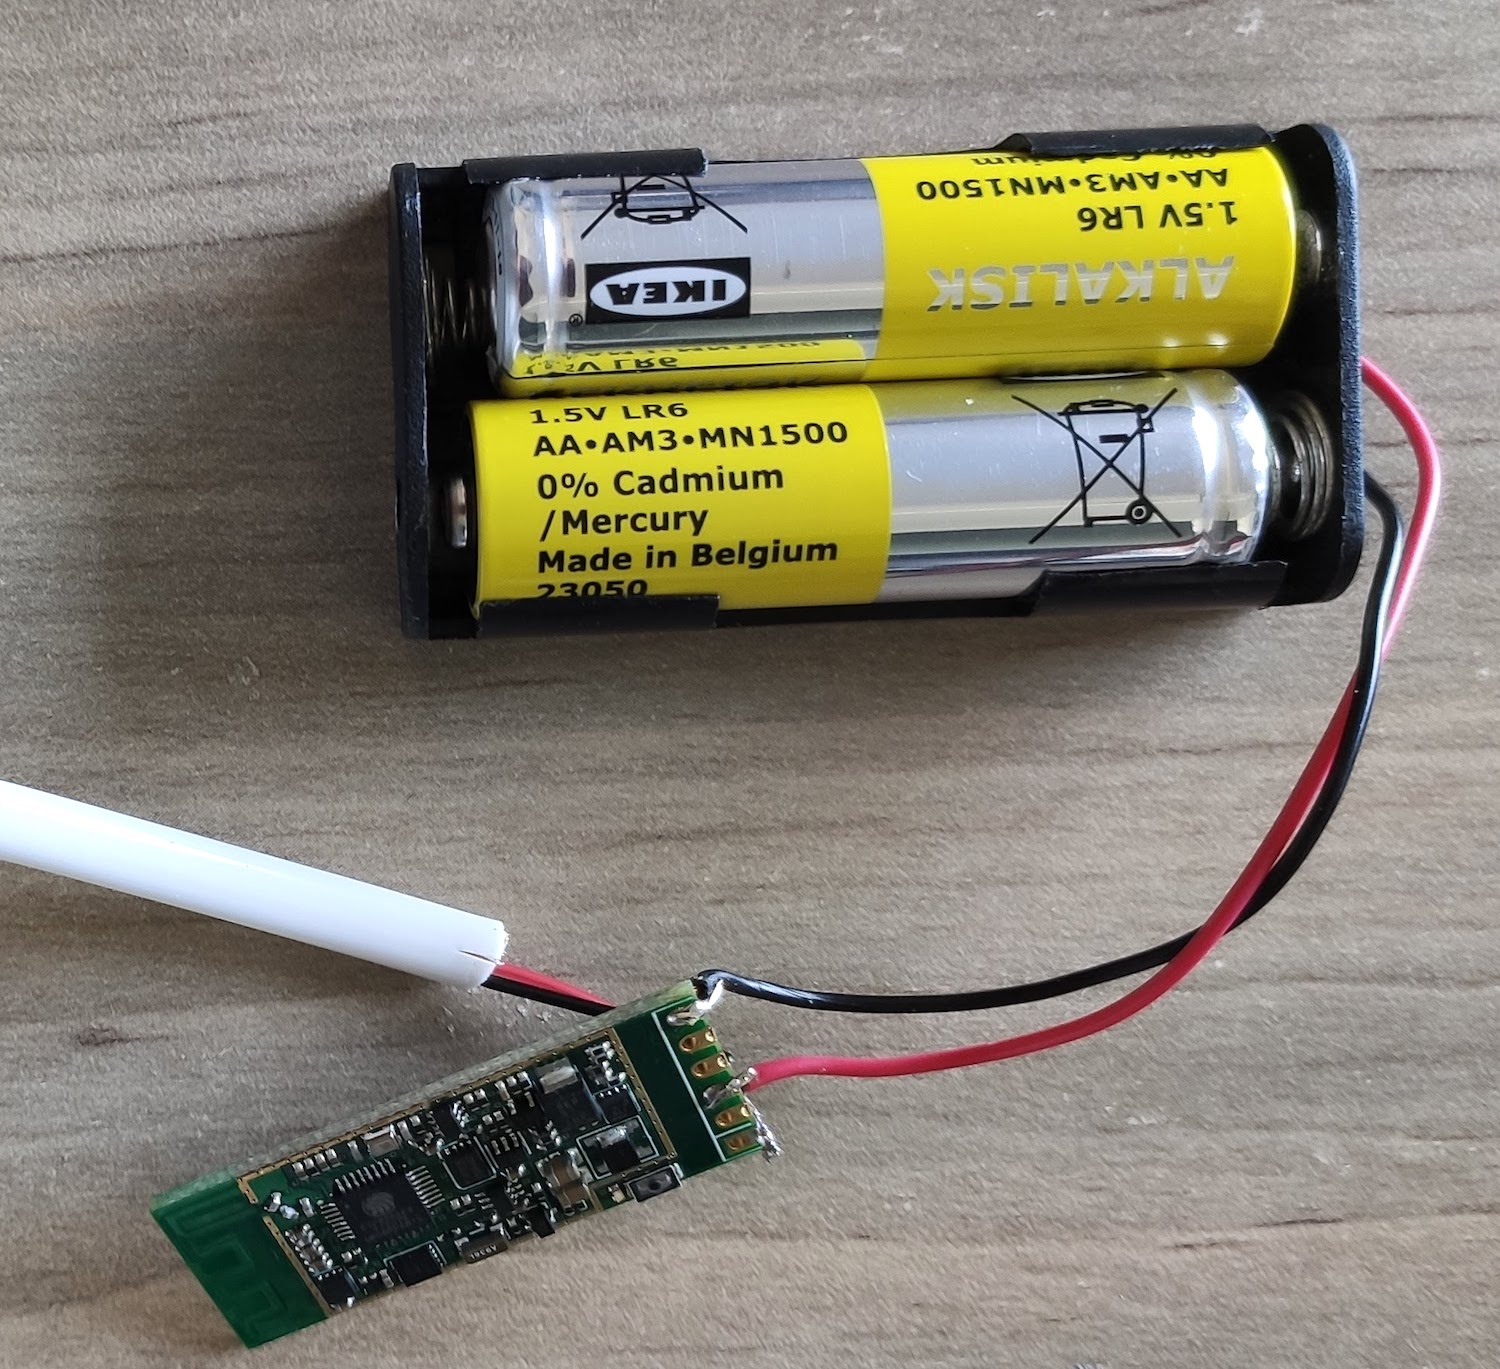
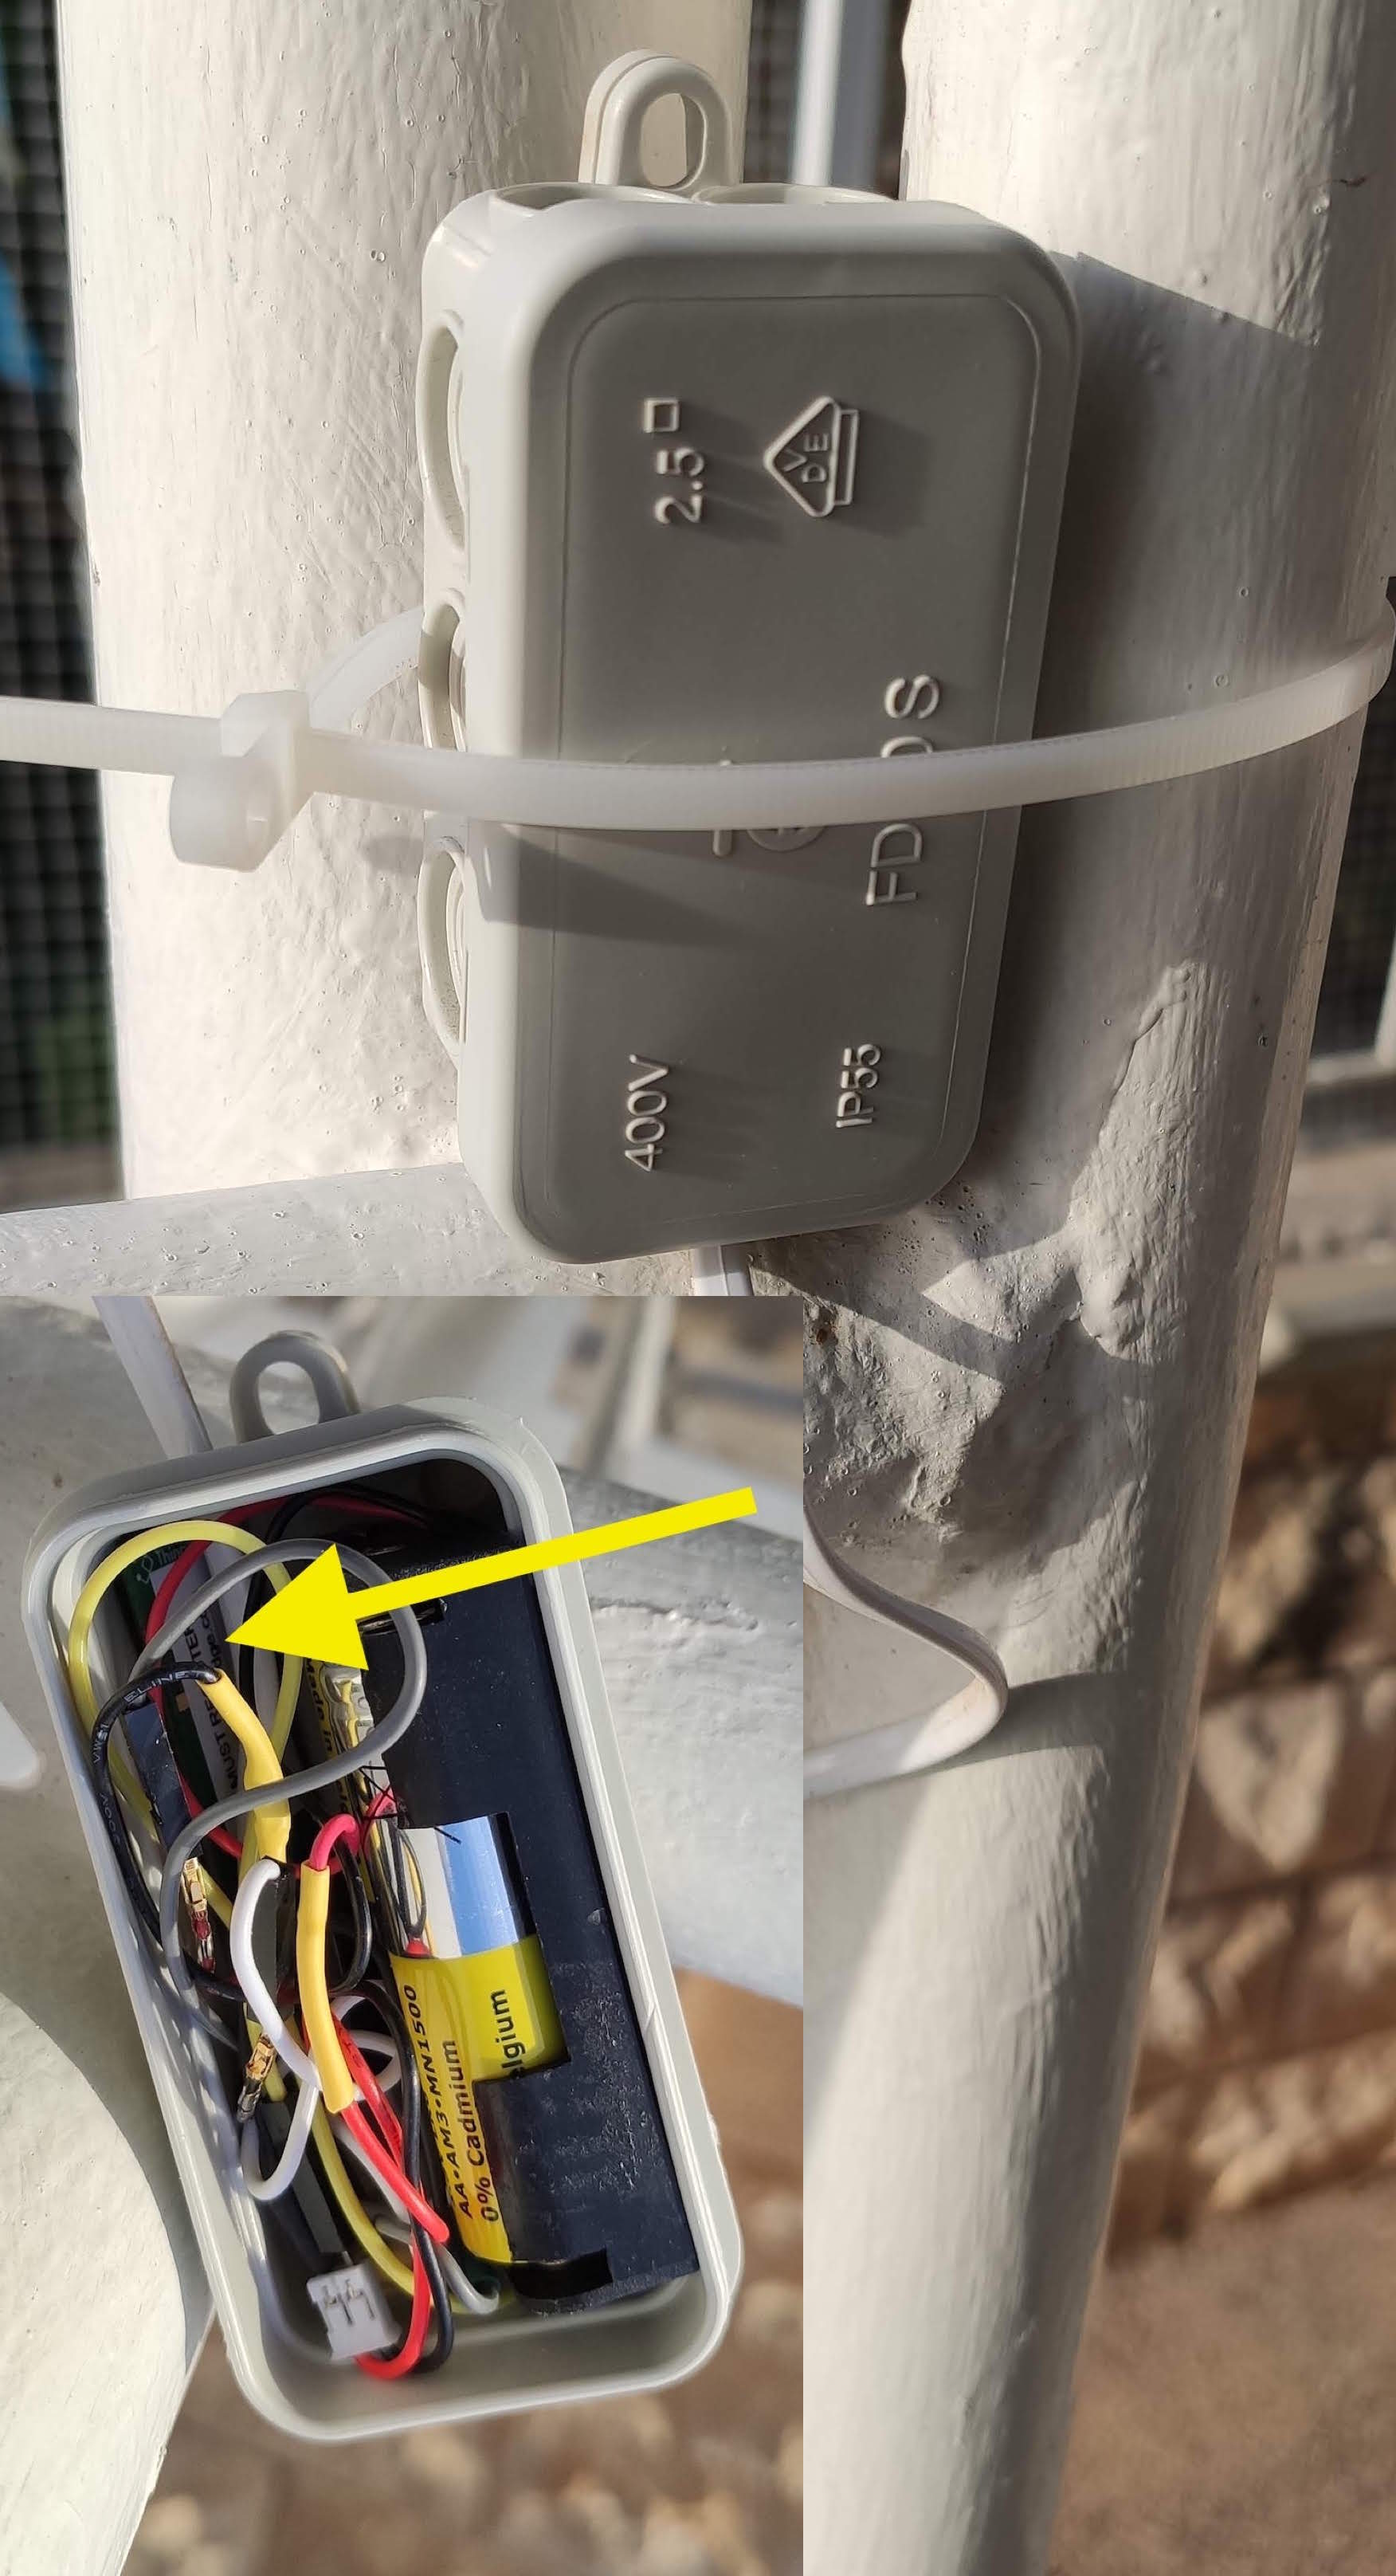
(In the photo above there are a lot of wires inside the housing. I added plugs and sockets for the battery and reed switch because I needed to be able to unplug the board without dismantling the entire project.)
The first obstacle
I discovered that Cricket will only work with a Normally Closed (NC) reed switch and in my experience, they can be hard to find - so I had to make one. (An NC reed switch is closed without a magnet, and open when next to a magnet. Most reed switches are the other way around - closed next to the magnet, and open away from it.)
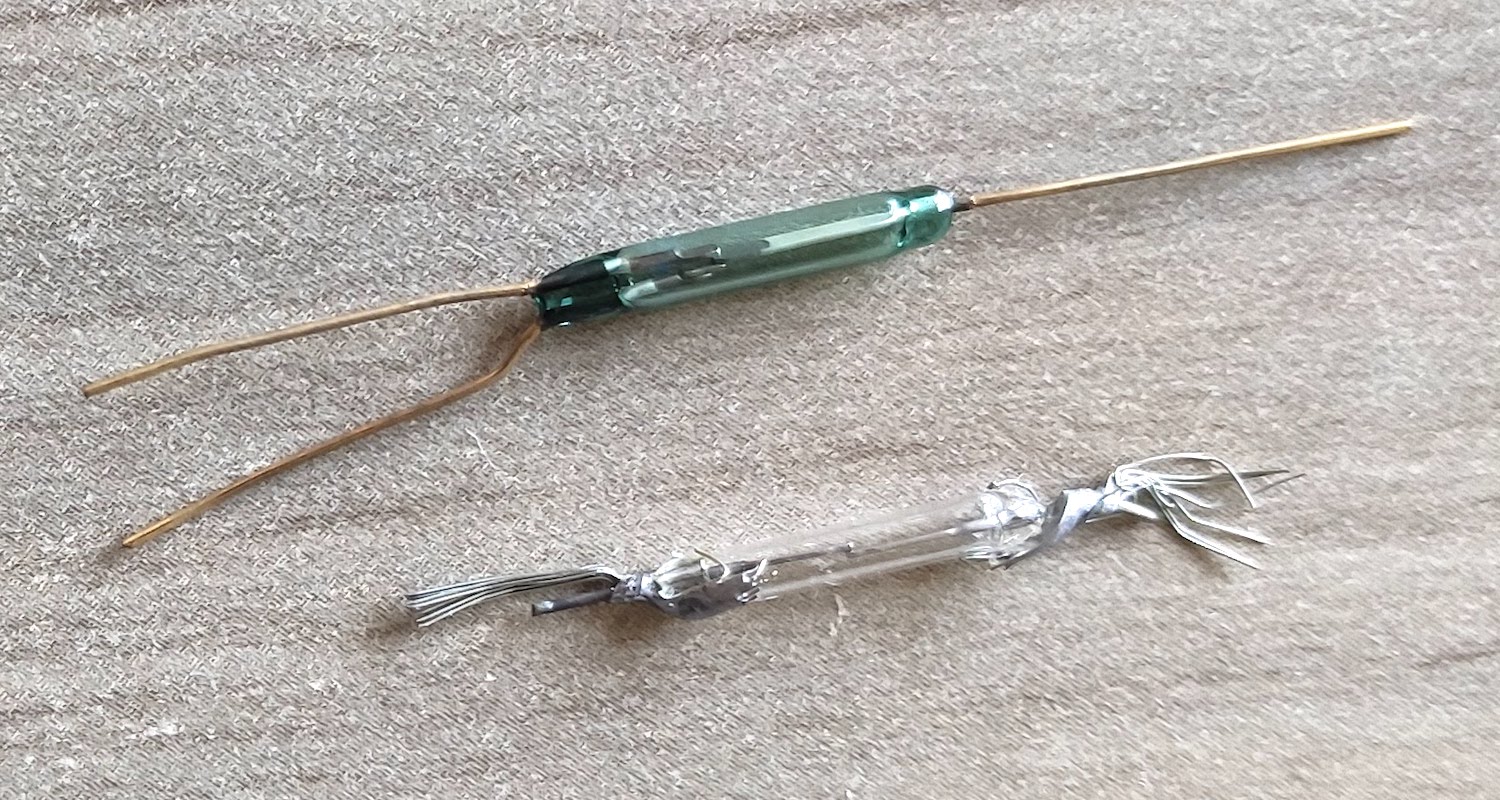
I replaced the glass reed inside its plastic housing with a NC version. (The green one in the photos offers NC or NO, depending on your need.)
Once installed, the switch - attached to the Cricket wakeup pin - worked perfectly.
The Second Obstacle
When I first installed the Cricket, I had it send an email through IFTTT. For an hour I couldn't get the battery or temperature data to come through. I eventually turned to the developers. I suppose one of my functions is to help them debug because they then realized that IFTTT had changed something which would require the Cricket board to be updated. So they sent me a new board.
I brought this up in a subsequent conversation with the developers. To be taken seriously, their device can't rely on a 3rd party service remaining unchanged. Fortunately they understand the significance and assure me that future boards will have firmware that's updated Over the Air - in the same way the Cricket is currently configured.
Time Trial
The Cricket has been attached to my mailbox for more than a month, and I have to say, it's amazingly stable. The only false positives have been user-induced. I set it up so that it sends me an alert along with the current temperature and battery level. (I receive alerts in IFTTT, to my Smart Watch, and to the little MQTT alert board pictured above.) In the time it's been deployed, I've seen no degradation of the two AA batteries. This in itself, for me, is the most important thing. At this rate, the batteries could literally last for years - which introduces many possibilities for future projects.
However, these is a downside. More often than not, a letter sticks out of the box not allowing the flap to close. The reed switch remains closed and the Cricket continuously sends alerts. If I'm not at home it would drain the battery and quickly use up my daily IFTTT alert quota. The problem can be fixed with a separate latch switch, but I don't want to go there.
I have mentioned this issue to the developers and asked for a way to limit IOT wake up calls. Perhaps the next version? (If not, the Cricket may end up being unsuitable for this project in the long term.)
Other projects using Cricket
The developers created a couple of example projects that may be of interest:
- Motion sensor - this is a very neat little sensor and they even provide stl files to 3d print the case. It looks great and works well, but there is one problem. Although the Cricket uses very little current, the Motion Sensor - which requires at least 5v - is more demanding. I think I could probably get a few days out of a 9v battery - which limits it a bit.
- Door Sensor - another nice project, much the same as my Mailbox Notifier. Using the Cricket, the sensor can be constructed in a matter of minutes - but it's a rather expensive way of doing it. If you know how to program the ESP, this video shows you how to do the same for $2.
MQTT and Node Red
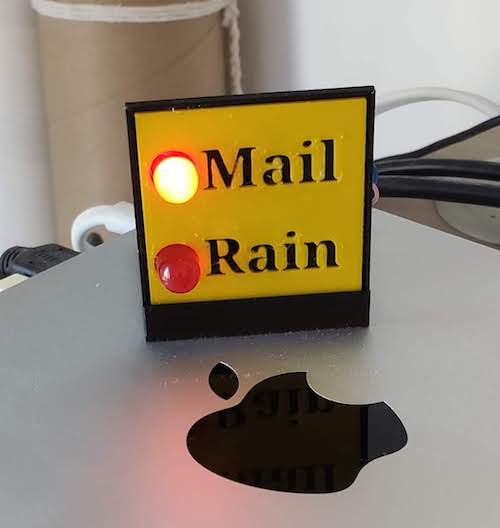
I alluded above to my adventures with MQTT and Node Red. There's no question that using them with the Cricket hugely expands its possibilities. For example, I've created a Node Red flow that takes data from the Cricket and through MQTT triggers other devices around the house. The little Mail/Rain alert board above is one example, and I'm working on expanding it to alert me to passes of the International Space Station and Covid 19 cases near my house. The Cricket integrates beautifully with MQTT and Node Red and makes flows very simple to create.
Conclusion
After playing around for over a month, I've come to look at this board as something like the Apple of the ESP8266. Right now, it is considerably more expensive than the flash-it-yourself ESPs makers are accustomed to - or even the cheap relay implementations like Sonoff or Shelly. Like Apple products, it also limits user-intervention to prevent interference with its functions. But the upside of that - OTA programming without a line of code places the Cricket in a league of its own.
Taking the intense engineering that has gone into the Cricket, combined with its ease of use, it's by far the most "launch and forget" implementation I've come across. It's the go-to board where you want quick implementation, long-lasting, easy powering, and complete stability. I'd be happy to install such a board in a critical project, like an old-person's emergency panic button, or in a sensitive agricultural scenario where a failed controller could cause substantial damage. I can even see it competing with commercial sensors that need ultra-long battery life, reliability and peace of mind. (An example would be the wireless sensor tags used by co-blogger Allan Schwarz here. Allan is actually looking at the Cricket to perform this very function.)
I talked at length with the developers to find out who they are aiming at. Clearly makers like myself are one target, but the price compared to a Wemos or an ESP is still a little restrictive. They are aware of this and ultimately want to bring the price down. But even as it stands right now, a complete amateur with no experience at all could put together a sophisticated IOT product to rival anything commercial - at a much lower price.
I now have two of the first-generation Crickets. One is in my mailbox and I'm still experimenting with the other. Moving from one project to the other without fiddling with the Arduino IDE or 18650s gives me space to exercise my imagination rather than endlessly troubleshooting my poor programming and electronics skills. A project that could take me a week in the past, is now down to an hour - and this for me is one of the greatest benefits of this little board. I hope they succeed, because technology at this level deserves to make it.